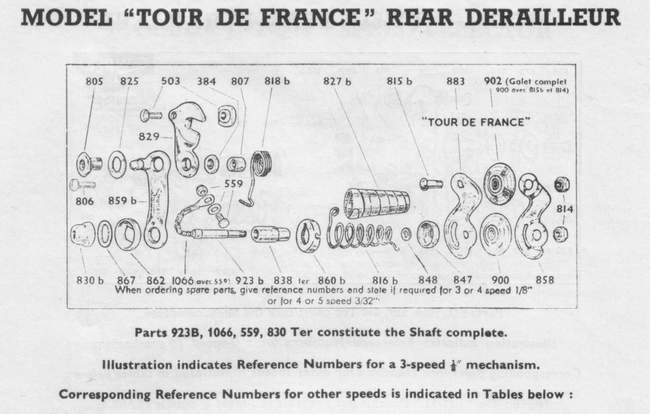
Campagnolo bottom-bracket axles
Posted: Monday 21st September 2020
Having spent a fair amount of my life juggling cottered axles and bottom brackets, I must confess some puzzlement in relation to Campagnolo cotterless bottom-bracket axles. Perhaps that should be cotterless bottom brackets/axles, full-stop. I am hoping someone out there with much more know-how will add to the page until we have a definitive guide to this black art.
Early Campag cotterless axles had their own taper, JIS is the slightly better match to the early Campag axles – thanks to Michael Alford for this information. At some date, I have heard 1993/4, they converted to the ISO standard, this results in a slight change in the length of the tapers.
The difference between ISO (International Standardization Organisation) and JIS (Japanese Industrial Standards) lies in the length of the tapers. ISO is longer, resulting in a smaller ‘square’ at the end as the taper has more effect. JIS, of course, is shorter. All tapers are 2º from the centreline. Sometimes it is possible to use cranks on the opposite format, JIS cranks on ISO axle will sit firther inboard, conversly ISO on JIS will be further out. However, using JIS on ISO carries the chance that the inner edge of the crank will butt up against the edge of the taper and no amount of tightening of the bolt or AK will secure the crank sufficiently for use. The ISO standard is used by Campagnolo, the older Stronglight cranks and TA plus other European makes. JIS is of course used by Japanese manufactures.
The diagram below from the 1958 Campagnolo catalogue does give some idea of which axle was which at that time. Pista is of course track and would indicate a single chainring. Strada is road and will show dimensions for a double ring.
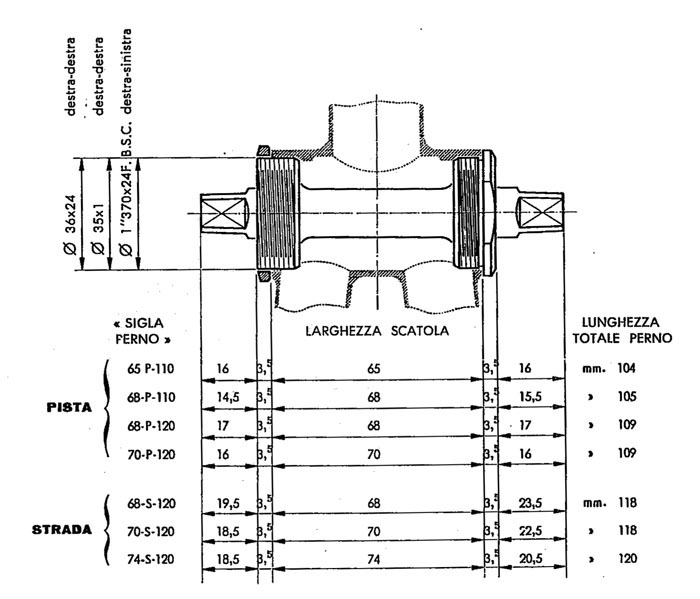
As an example of axle stampings:
65-P-110 shows a bottom bracket width of 65mm for a Pista (single) chainset with a total width of 110 (for chain alignment with rear sprocket)
70-S-120 shows a bottom bracket width of 70mm for a road (double) chainset with total width of 120mm
36 x 24; 35 x 1 and 1.370 x 24 are the available threadings for Italian, French and British bottom brackets, destra/destra indicates two right hand threads whereas destra/sinistra is the UK’s right/left-hand thread
65, 68, 70 and 74 are bottom-bracket shell widths. UK is usually 68. This affects the width of the bearing surfaces on the axle and some Italian bottom-bracket cups are narrower which adds to the confusion if you are making up a bracket set from odds and ends. See comment from Harvey Sachs below in italics mentioning “thick cups”. Maybe he was building up a frame with 70mm bracket shell using an axle for 68mm shell and thus needed the ‘thick cups’.
By 1968 the overall widths for the road axles had reduced to 112, 113 and 117 and cups with .5mm increased threading were available.
On later axles SS denoted road – no idea why the extra ‘S’. There was also ‘C’ for cyclo-cross axle – triple ring?
If you are smart you can use the overall width of the axle as a guide for rear hub/sprocket position for a fixed-wheel set-up.
For fine tuning, Campagnolo later produced lock-rings in three thicknesses to prevent that ugly situation of lots of thread showing beyond the lockring.
The provision of cups with extra thread plus lockrings of three thicknesses show that I am not the only one to struggle to find the correct combination. Get it wrong and it can be impossible to get a lockring on, or at the other extreme, have too much thread showing beyond the lockring.
Michael Maher from Charleston, USA points out that there is a superb technical piece on Campagnolo BB and axles on pages 5-7 of Campagnolo Record News technical bulletin (Winter 1982-83). Many thanks for this, it is the most comprehensive article I have seen on this subject:
http://www.campyonly.com/history/record_news/record_news_vol_1-2.pdf In a recent discussion on Campag bottom brackets on Classic Rendezvous, Harvey Sachs asked:
“After cleaning everything, I tried to reassemble with a Campag thick-cup BB set I hard. Right cup fine, left very tight. Every Campagnolo cup I tried was very tight.”Mark Bulgier replied:
“English BB cups are all made to the same nominal size, but vary within the tolerances for the English BB thread standard. Campy cups are among the largest (maybe the largest) and therefore the tightest-fitting. So you need the BB shell threads cut on the large side of the range for Campy cups to thread in easily. It could be that even if your taps are sharp they may not make a thread that will be an easy fit for a Campy cup. If that’s the case, you may need to take it to someone that has real Campy taps, or a reasonable facsimile thereof such as Cobra or Silva.”
Mike Baker from Bromsgrove says: I have successfully run TA cranks on Campagnolo double and triple axles although strongly advised not to do so. It seems to work well enough but I would agree that the cups are a very tight thread in the bottom bracket as mentioned above. Unless fitted carefully, the crank retaining bolts can strip the axle thread so tread carefully. I have also fitted Stronglight 49D cranks to a Thun sealed axle by discarding the worn plastic cups and replacing them with Brampton cups. These German axles are superbly engineered, as good as most expensive ones and give a very smooth ride with no play.
Mike goes on: it was once possible to buy a set of 3 Campagnolo bracket fitting tools which makes the job easier but the tolerances on the British BB threads are very tight still. These, like all good tools, are expensive but Ofmega did make a cheaper copy which in my opinion is inferior. Campag. tools comprise a fixed cup spanner, adjustable cup spanner with two pins to fit the 2 holes in the cup, and a lockring spanner, the opposite ends of the spanners doubling as headset and pedal spanners. These “proper tools” are an exact fit and make the job a lot easier although my fixed cup spanner is becoming slightly rounded after decades of slippage on the very thin cup edges! I find the best way is to clean any surplus paint etc. from the BB threads with a hard toothbrush and penetrating oil and then fit the Campag cups with oil for only 3 or 4 threads before “unwinding”, gradually increasing the depths until the two sets of thread become compatible, altho’ it will always be a tight fit, good for keeping the rain out! As with the crank bolts, it is very easy to get a crossed thread, almost impossible to rectify without engineering, so it is essential to do the job with patience and a “good eye”! If you can find a set of tools at a jumble they are a really good investment.
Although our cut-off time for the website is mid-seventies we will publish any subsequent data should we get it.
Posted: Monday 21st September 2020
This article appears in the following categories.
Upcoming Events
Whether you are looking for a gentle social meet up, or a 100-mile ride browse the community’s upcoming events and plan your next weekend outing.