Campagnolo bar-end levers - servicing and fitting
Posted: Monday 21st September 2020
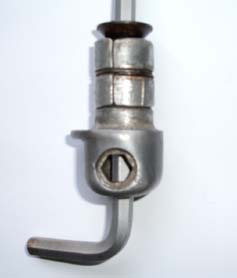
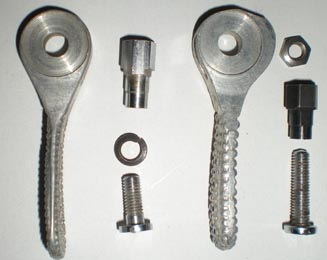
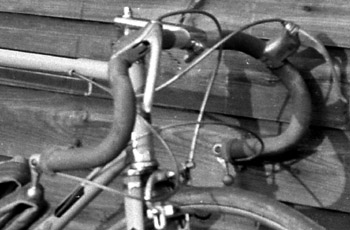
This could be classed as a classic case of the blind leading the blind as I couldn’t work out the complexities of the Campag bar-end levers for ages. I think I have it in my mind now and some recent chains on the Classic Rendezvous mailing list brought it back to me. To the left are the parts of the lever, minus the inner cable and the locknut. The handlebar control body of the gear consists of the mounting for the lever plus the smaller diameter segments which slide into the handlebar end.
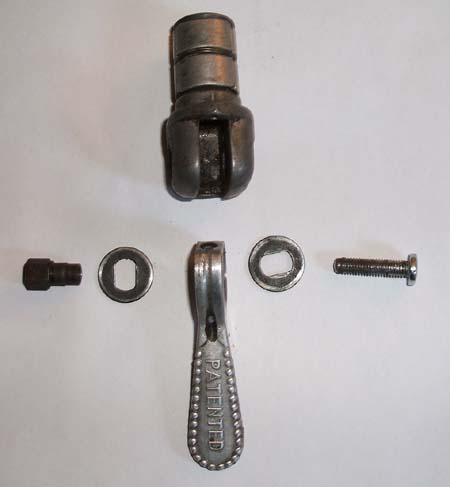
The segment component works rather on the principle of a stem expander bolt. In the image on the left, the round part looks like one-piece but it is divided into three segments and held together by a circlip-like spring segment holder which can just be seen around the middle..
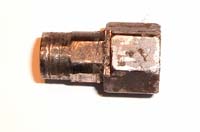
This screw, with a hexagonal hollow through it, screws in from the outer end and into the body. When it is tightened the countersink acts as a wedge expanding the three segments. Ah, I hear you say, how do I get the allen key in to do this when the unit is in the bars? This is where the cunning hexagon hollow comes in – with the lever out you can slide the 6mm allen key into the ‘wrong’ end of the bolt and tighten it from here.
Tightening the bolt feels as if you are undoing it as you will be looking at it from the wrong end. A 6mm ‘T’ bar allen key is the best tool to use for tightening, if you only have a normal ‘angled’ allen key you hay have to exert some extra leverage as you will be using the short side to tighten, needing the longer side to reach through the body to the segment tightening bolt. From this you can see that you have to be able to dis-assemble the whole lever end of the changer in order to fit the body into the bar end.
Now you need to study the enlarged image of the ‘nut’ on the right. The bolt shown for the lever screws into the left-hand end here and one hears complaints that the bolt doesn’t want to do this freely. The whole assembly needs to be cleaned up and lubricated as maybe some reaction has occurred between the bolt and the ‘nut’. If you look carefully at the ‘nut’ you can see that there is a flat cut into the inner side of the outer hexagon. The washers, or lever friction plates, shown above can be seen to have flats either side of the ‘hole’. The washer flat has to seat on the nut flat – that is the easy bit.
Going back to the body of the changer the holes for the bolt and nut are, either side, one round and one hexagonal (see image centre below for the hexagonal). The secret to assembly is to have the lever at right angles to the body with ‘Campagnolo’ facing back and the washers sitting in their recesses with the slotted holes exactly in line with the lever. It is essential to have the inner cable threaded through the lever at this point. Examine the ‘nut’ and you will see that the flats are in line with two of the hexagonal flats and that there is only one way this can go in and obviously only in one side of the body. Gently ease this in until the hexagonal is flush with the casing. Now the bolt goes in from the other side (in the round hole of course).
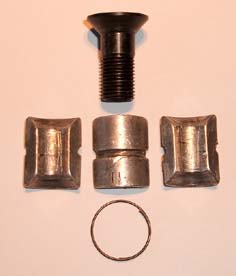
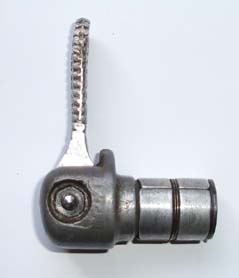
In the image top right it can be seen that two sides of the hexagonal are in exactly the same plane as the lever – this is the key to the assembly. All that is left now is to fit the cables and decide where to exit from under the bar tape before heading for the frame down tube. This is another subject which can, and has been, debated at length!

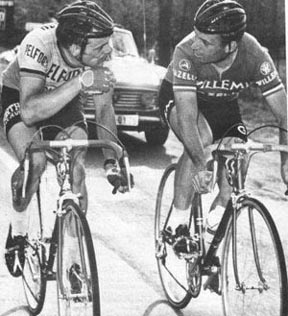
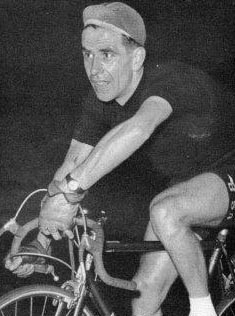
The cables should always be taped to the bars to within a few centimetres of the stem; as seen in the image (below) of Samyn and Van Looy. This allows a sweet, pleasing to the eye, curve to the cable eyes on the down tube. Whilst allowing that Bob Maitland was a very good rider, the Chief Constable points out that no self-respecting person would be seen with the cable taped this way (even with a Cyclo lever). It looks as if Bob had to ride with his left hand glued to the handlebars as fitting punishment.
I enjoyed the piece on the Campag bar-end levers as I used these for racing in the early sixties and for their time they worked well as I remember.
Their use was partly fashion – Rik van Looy was a hero – the Emperor of Herentals – but primarily when we were using close ratio rings (48/52) with only five sprockets (six from 1966) – maybe 14/16/18/21/24 – you almost always had to make a double change using front and rear mechanisms simultaneously to get a manageable gap between gears. The double change could be done with down-tube levers if you were dexterous and had prehensile fingers but it felt safer and easier with bar-end levers. If it was good enough for Rik it was good enough for me. I feel that these levers were used mostly by Belgian/Dutch riders where you couldn’t take your hands off the bars much because of cobbles and poor road surfaces. Safer when bunch sprinting too.
I guess that looking back it was probably a slow change given the length of the cables but I don’t recall any great problems and the cables HAD to be taped right back up towards the stem for that Flemish pro. look. I enjoy the site even though I have no great desire to go back the old equipment days, but it all brings back happy memories.
I just saw the bit on handlebar controls. I was a user of these from 1950, at first the Cyclo, and from about 1955 Campagnolo. All our bikes still have them, although sadly rarely used. First, the picture of Bob Maitland (above) showed almost the most effective way of fitting the cable. Unfortunately these controls which were expected to work even in the wet, must be fitted with the least number of bends in the cable, and the less sharp the better. Bob was right. Tie them up to the bars and put a tight bend in by the stem and you would rarely get bottom gear, as the Cyclo gear depended on the spring in that direction. We also bent the Benelux arm and cage so that the top roller was nearer to the wheel when on the large chainring, so that the extreme gears were available. I used to bend them to cover 6 speed block, produced by putting the top pair from a Regina on a Simplex 5.
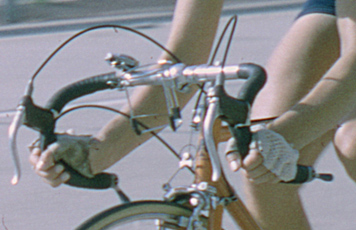
I used to change both at once off the saddle on any hill, unlikely with the Campagnolo GS. Also changed both at once with a left hand handlebar control and a Paris Roubaix. Campagnolo supplied very flexible cables, the outer being stainless steel with no cover, and the inner a 49 strand ( 7 strands of 7) very flexible wire. The cable goes through 2 holes in the lever, plus the cable stop. Very important to fit the cable through before fitting the lever, and pull the cable completely through one hole at a time, or you will create a tight coil of wire that is almost useless. the 1952 image (below left) shows my 1952 cable. The right hand cable outer would rise a little under tension when in use. Also, (below right) shows Mrs B’s cables after 5 years use without any servicing other than light lubrication. (Good to see that Mrs B got decent levers of her own – many wives of this era had their husband’s hand-me-downs . Her cables are taped up as far as the brake levers – Peter Underwood)
More contributions below from bar-end users on their experiences:
I have had experience with adjusting these bar-end levers, having maintained them for years. I’ve found that when adjusting tension (Campy T-wrench for nut and a short flat screwdriver on the road), there’s a tendancy to just tighten the lock nut a bit more rather than loosen it, adjust the screw and then re-tighten.
Both work for getting the right amount of tension to the shifter, but I guess I’ve tightened the locknut just a bit too much myself. The barrel that the screw goes into must deform it’s threads a bit making it hard to turn, not sure that lubrication will change that. I have just muscled it anyway in the past, and have a couple extra shifters.
Once it’s out, run the adjusting screw into and out of the unit a bit both ways so as to loosen it up. I’ve even tried another screw to chase the threads with, which at least psychologically seemed to work. The screw is hardened, the piece inside doesn’t seem to be, and it never seems to loosen up completely. The shifters will probably stay hard to tighten for the rest of their useful lives.
Slather the whole thing in grease when putting it back together and it should work fine. It’s a pain to have to take them completely apart just to change a cable. They really are not as easy to work on as Suntours or Shimano, but work far better to me, just buttery smooth when adjusted right.
Line up the flats on the openings of the washers with the lever and slip them in without changing the rotation of the lever while keeping the lever parallel with the vertical flat of the opening. Then lining up the flat of the inside piece when installing it, I usually get it in either all the way or in a bit. It seems to pop in when you screw in the tightening screw. I try to adjust them so loose that the rear derailleur will just hold it in the biggest cog, makes shifting so sweet. If they are set up that loose, you may have to tighten them just a tad when the cold weather sets in as it seems to loosen them up just that much. I’ve worried about the inner piece distorting/disintegrating myself and have got extra shifters when I could. I have at least one that’s been cannibalized. The plastic expander also doesn’t seem to hold up completely. Years ago, I had a set of the expanders turn to powder and break apart, but the others seem to be holding up fine.
When I’m installing the shifter body into the handlebar, I first get the shifter body to a snug fit by hand, then get a fairly large adjustable wrench wrapped in one layer or so of rag and do the final tightening with the Allen wrench (Campy T) while keeping the body aligned properly with the adjustable. I get it just a bit tighter so it won’t twist too easily on the road and the large adjustable so far has not marked the body of the shifter.
As these are an area of particular expertise for me I wonder what you’re attempting to do? Taking the lock-nut off would indicate you want to remove the lever in which case the screw just turns like any other screw. Remove it normally and the nut/bushing just pops out.
If the lever is off, and then you want to take the body off, the Allen turns opposite to the way you would normally think of because you’re at the wrong end of the bolt –
you turn counter clockwise to remove the body. And when you reinstall just moisten the friction disc with oil to perfect the shifting. It’s worked for me for 35 years.
When we were using Campagnolo handlebar controls in the 1950s, we used to saw about 1 inch off the handlebar end , to compensate for the length of the body of the controls, and take the levers a little further away from the rider’s knees. It also helped if the bars were tilted slightly upwards, rather than horizontal. This meant that, if you were riding out of the saddle, there was less risk of your knee hitting the right hand control, and changing up unintentionally on the rear derailleur, especially uphill, a rather painful process as you tended to hit the saddle fairly hard!
Regarding the routing of the cables,obviously the shorter the better, as increased length, plus the friction of the longer outer cables,could slow the change;- possibly why continental team mechanics disliked them as they invariably took the longest route near the stem and were compressed by the handlebar tape. The shortest route and probably the best curve emerges after the straight section of the handlebars, next best being underneath the bottom of the brake levers, not so pretty but perhaps more effective!
Posted: Monday 21st September 2020
This article appears in the following categories.
Upcoming Events
Whether you are looking for a gentle social meet up, or a 100-mile ride browse the community’s upcoming events and plan your next weekend outing.