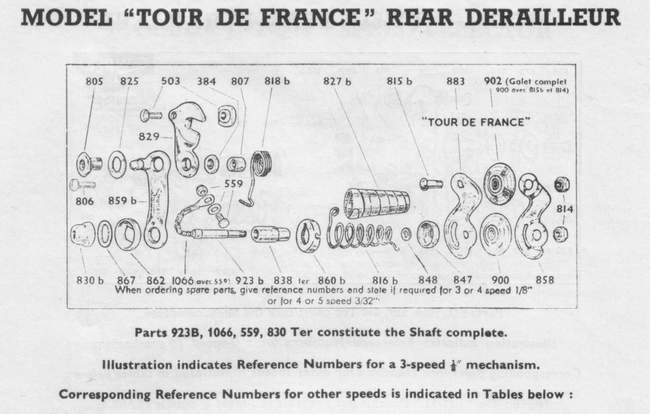
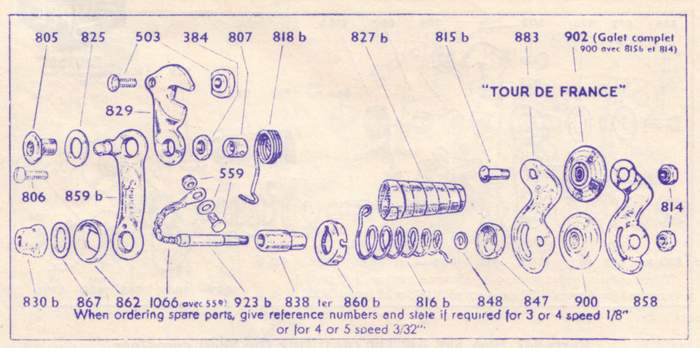
Simplex Tour de France Adjustment
Posted: Monday 21st September 2020
I recently met someone on a ride who had no idea how to set up a Simplex Tour de France rear changer so I thought that these notes would be a useful guide for those setting them for the first time. When I tackle the job I start it without the chain in place. If it is already fitted and you don’t want to split it then it can hang from the chainwheel – you may need some protection on the chainstay. It helps to have the machine raised by using a stand or suspending it from above – I prefer the latter. My local bike shop uses bicycle chains to suspend the machine to work on – this is more solid than cord or thin rope.
There is not much scope for adjustment. These gears come in 3 and 4 x 1/8″ (3.17); 4 and 5 x 3/32″ (2.38). It is said that 3 x 1/8″ will cover a 4 x 3/32″ but it is quite critical. It is not easy to identify one from the other except that some 5-speed have ‘5 vitesse 238’ on the side plates. It does help to fit in some adjustment to the outer cable tension if you can. The Simplex lever has an adjuster screwed into it but this of course only works if you have a full-length cable. If you have a braze-on cable stop on the chainstay it may be possible to move the adjuster to the rear of this where the short length of outer cable abutts.
We can’t stall any longer so it is time to gird the loins and fasten the gear – minus cable – by its hanger to the rear end (unless you are lucky enough to have a Simplex rear end with built-in hanger). Now for the moment of truth as you move the changer by hand from side to side to see if the pulleys line up with the higher and lower sprockets. If it does, rush out and buy a lottery ticket as it is your lucky day and all you have to do now is to join up the cable and go.
If however adjustment is needed the first thing is to undo the lock-nut (where the toggle-chain emerges from the changer) using a 17mm spanner. You are now able to wind the changer in or out. There is a knurled piece under the locknut and in theory you should be able to use this to turn the threaded tube within the hanger. Just think of turning a bolt in and out of of a fixed nut and this is what you are doing but with the changer on the end. If it is too stiff to move the knurled piece then there is a flat on the threaded hollow tube which takes a 12mm spanner. This is easy if you are are able to do it on the outside of the hanger but to do so on the inside you have to push the spring cover and spring to one side so as to get the spanner in. Ideally, the correct position will allow you to fasten the lockut abutting the knurled piece so you need at least a couple of threads to do this. If it turns out to be as critical as this do not overtighten the locknut as it will strip the few threads you are using.
With the Tour de France the lever is unusual in that you pull the lever back to drop to the smaller sprockets and you let the spring tension take it to the higher range. You may find that you have to set the changer to either the highest or smallest sprocket and then adjust the throw by cable tension. This is where the adjuster comes in handy but first you must get the length thereabouts by pulling the cable trough and locking it with the 8mm nut. Be prepared to do this several times and remember you need to take the tension off by moving the lever forward before undoing the cable securing nut.
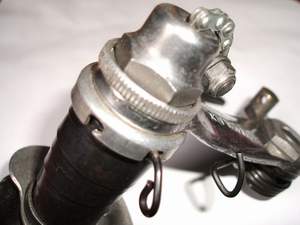
In the image above you can see the tension spring (nearest) engaged in a ‘notch’. The spring can be moved forward one notch at a time to increase the tension on the chain when it is fitted. A snag here is that the circular plate section with the notches is engaged in a peg. It is easy to dislodge this when you manouevre the spring. As there is only one peg it will move through 360 degrees. If you are very ambidextrous hold the circular plate against the drop arm as you move the spring!!
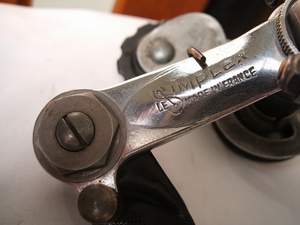
There is one more adjustment left now. In the image on the right there is a bolt head with a locknut and a spring engaged just over half-way down the drop arm. Extra tension can be applied to this spring by slackening the bolt and moving the spring to the rear. Having done this re-tighten the bolt. It is essential to do this with the spring not engaged on the arm. Some later Tour de France models have a decorative plate over the locknut. If you were a nasty cheat and wanted to make the gear look like an early 50s gear you could remove this plate. Do NOT do this if the style police are looking over your shoulder!!!
It is common practice to adjust the gear so that there is more ‘winding tension’ on the pulleys than originally designed. The effect of this is to get more ‘wind’ on the pulleys which will increase the chain wrap around the sprockets. You need to play with the springs and chain length to achieve this, especially if you are using a wider range of sprockets than was common when the gear was designed. If you lengthen the chain it allows the pair of pulleys to wind-up some more giving extra chain wrap. There is a limit to this though and a compromise has to be arrived at. To be safe you should limit the Tour de France gear to a 24T large sprocket although with a bit of fiddling you may get it to cover 25T. Remember it is better to have a 24 which will take up smoothly when you need it (on a steep hill of course) rather than a temperamental 25! Simplex later introduced the Juy 51, Juy 543, and Juy 59 which work on the same principle as the Tour de France but all can handle a 26 tooth sprocket.
I use the Shimano (wash my mouth out) method of selecting chain length in the first place. This is to put the chain around the largest sprocket and chainring and then add two links. Be prepared though to do further alterations. Sometimes I set it up with an old length of chain until the length is correct and then cut the new one to match.
Posted: Monday 21st September 2020
Contents
This article appears in the following categories.
Upcoming Events
Whether you are looking for a gentle social meet up, or a 100-mile ride browse the community’s upcoming events and plan your next weekend outing.